Tuesday, February 22, 2011

Do You - Doughmaker(s)?

Another day, another unsolicited, shameless endorsement of a product I love!  

Doughmakers are aluminum pans with a pebble texture that make it impossible to burn things...really! 
I love butter, and the pan, too!
Reasons to Love Doughmakers Bakeware:


1. Designed by moms!  Made of aluminum (a recyclable material)!

2.  They make baking with kids much more rewarding - even if you're still cleaning when the perfectly baked cookies are done!


Mr. Mess.


Let me just out these chocolate chips rigghhht...Doh! On the floor.  Mom!


3.  Cookies are lighter, crispy on the outside - More deliciousness to share - if you want to!

4.  They're a great gift!  My mom is the one I have to thank for this hot tip and for gifting me with my Doughmakers Bakeware - Thanks, Mom (Love you)!

MMM, they really are this good!


Monday, February 21, 2011

Kitchen Dreams and Realities


I've been perusing through Merillat's website:  
"Modern - Free Spirit" by Merillat
Over at Merillat.com, they say:  "The Dream Kitchen for the Real World"..."Stop dreaming, Start living".  (LOVE it!)


Merillat's website has this great tool to satisfy kitchen function/design; right/left sides of the brain; handy husband/waffling wife...

"Modern - Modern Attitude" by Merillat
With Merillat's Step-by-Step Kitchen Planner tool, you answer questions about your preferences (good for waffling wife) and enter kitchen dimensions (satisfies handy husband) and the program creates a rendering of what your dream actually, (just may), look like! 
"Traditional - Timeless Elegance" by Merillat
There are MANY MANY more cabinet choices.  I narrowed my cabinet choices very early on and could go back to change them......but I've spent so much time here already that I need to get back to my paying job!
"Eclectic - Relaxed Living" by Merillat

Which, by the way, Merillat is not paying me to endorse their products/website.etc.   
Though I have no formal affiliation with them, I wouldn't mind one, 
as this is just plain genius-fun!

"Country - Rustic Retreat" by Merillat
So many choices! 
"Modern - Urban Edge" by Merillat

Now, back to reality!  
(Where, maybe, someday, I could pull off something like this?!)
"Modern - Modern Attitude" by Merillat

Check out the Step-By-Step Kitchen Planner at Merillat.com!  

Can We Make Cookies?


As a young baker I memorized the Chocolate Chip Cookie recipe on the back of the Nestle's Chocolate Chip package.  Whenever I made them, though, they usually turned out MUCH to flat, sometimes even running together on the pan!  

During my lifelong  J  search for the "perfect chocolate chip cookie recipe",  I've found a couple recipes that turn out crispy, soft, buttery and delicious.

The recipe below is from a pretty food blog called Vanilla Sugar  (I modified it just a tiny bit).  

The original recipe uses cold European butter that you grate, then put back in the fridge, then take out and combine with the sugars and eggs when ready. 

Those additional steps make for a great-stand-up-cakey cookie, but there were too many additional steps for me (and my lack of ability to attend to the task!).  My modifications are REALLY slight, but, I think, helpful to those of us who want our cookies delicious and have:
a) no patience 
b) famished children
c) low blood sugar
d) other reasons we don't want to discuss, OK?!

Here it is (Ta-Da!):

Chocolate Chip Cookies
2 sticks salted butter, room temp/softened 

3/4 cup granulated sugar 

3/4 cup packed light brown sugar 

2 large eggs 

1-teaspoon vanilla extract 

3 cups all purpose flour

3/4 teaspoon sea salt 

1 and ¼ teaspoon baking powder 

1/2-teaspoon baking soda 

12 ounces (2 cups) semisweet chocolate chips or chopped chocolate 


In a mixing bowl, beat butter and both sugars just until just combined. 

Add the egg and vanilla and beat just until incorporated. 


In separate bowl, stir together flour, baking soda, baking powder and salt.   

When thoroughly mixed, add to batter and stir just until blended.

Stir in chocolate chips.

Using small cookie scoop, mold into tablespoon sized balls.

Keep them as balls on the cookie sheets. (Don’t flatten.)

Chill dough balls for 20 minutes BEFORE baking. 


Bake at 365 degrees for 8-12 minutes (or until done).

Makes about 12 cookies


My favorite vanilla from Penzey's Spices


Here are some "tips":
(In other words, ignore me completely and/or use what works for you!)
  • When working with my kids:  I like to measure the dry ingredients out first, then give the bowl and a fork to one child to stir.   The other helps with the sugar/butter mixture.  Then, they each get to crack an egg! (Good thing I've got just two helpers!) :)

    • I’ve found that room temperature butter (soft, not melted in any way), mixing by hand, and chilling the dough, makes a crispy yet soft on the inside cookie.
    • (In a pinch, I have used butter that I softened (with a portion melted) in the microwave and the cookies did not “stand up” – they flattened right out – even after the cool/freeze step.)

    • I use the bits of butter on the butter wrappers to grease the pan/s.
    Mini Chips are my favorite!


    • If you love nuts - go ahead and add 1 cup!
    • When you add the flour mixture, the dough will be quite dry/stiff – don’t be alarmed (and try not to “overwork” the dough when forming into the cookies).
    • I’m much to impatient to form every single cookie into a ball- and I tend to end up with a “tough” cookie when the “form into a ball” step takes place.  So, I fill my small cookie scoop (1-1/2 in.) to just the top, or use two teaspoons (the spoons you use on the table) to shape the cookies.
    Ready to chill, then bake.


    • More impatience - I “chill” the cookies in the freezer –until they firm up – then bake.

    • Possibly my favorite tip is from Vanilla Sugar:  Bake at 365 degrees (about 8 minutes for frozen or chilled cookie dough has worked for me).  Love this temp with this recipe!

    • When making to bake another time, I freeze the cookie dough balls very close together.  (I save this "disposable" pan just for this purpose- it's lightweight- goes right into the freezer, and I won't have to be without my favorite pan/s while they are freezing.)  
    • When frozen, I toss ‘em in a labeled Ziploc bag- (with time and temp directions).   The frozen lumps of dough make a great gift! (And a not-so-great snack for a sneaky 6-year old!)
    • Baking Zen:  I try not to bake if I'm distracted or angry...much less frustrating and things DO turn out better! 


    Enjoy with someone you love!


    Saturday, February 12, 2011

    Board & Batten

      
    One thing I vowed silently to myself when beginning this blog:  

    Stop WISHING I loved my house and BEGIN to make changes (or at least attempt them!)   Not that I have zero DIY experience, I had just given up on the projects I used to love to do! 

    Here is a view from our living room to the teeny tiny entry I've mentioned before.

    We've since done the following:  (And I mean the "Royal We" Me, Myself and My Handy Royal Husband - as I'm not ENTIRELY trusted with the nail gun, saws, drills - any of HRH's tools!)

    1.  Taken out the window!  
    That was such a "Duh-Aha!" moment!  The window was part of an (former) outside wall on our old house - and was really getting on my nerves!  I managed this demo all on my own - thankyouverymuch!  :)

    2.  Ripped off the (stick-on!) mop board.   (We were SO not staying for long!)


    3.  Added board and batten.


    4.  Filled, sanded, primed and painted. 

    (I'm allowed to use the sander without supervision. :)

    I used the whole tub!

    Love you brad nailer.

    We used 2 -1/2 of these.


    "Before"
    After, so far!

    HRH's comment on the after:
    "It's really going to 'be the pits' taking that down when you change your mind!"  Thank you, honey!  :)

    A little more trim, some accessories and possibly a bit a color in the way of (more!) paint is on the agenda.

    Enjoy your day!  Stay Tuned!

    Friday, February 11, 2011

    Valentine Buffet

    While I'm (desperatly) trying to formulate a plan for my kitchen cabinets, 
    let me fill you in on something new (to us!) in our kitchen...

    ...a buffet!  This piece once belonged to my grandparents.
    They passed it on to my aunt, who no longer has room for it...and 
    (thanks to my dad's lifting and hauling) she passed it on to me!  


    The photo is of my grandparents on their wedding day.  The teapot was my grandmother's.  (Just had to reunite them for a bit of nostalgia!) 
                    
    The little heart cups and saucers are from Goodwill.
     (Aren't they cute?)


    My grandfather's name was "Val"...Valentine.
    He ALWAYS went by "Val" and hated his full name. I think it's perfectly romantic and suited him well as
    he was a very gracious man.

    My grandmother was stylish- as much as a mom of 12 (!) was allowed.
    Her bouquet and hat are so lovely...
    she was lovely, sweet and kind..a real "lady".


    Because I can't finish one project at a time- 
    what do you think - paint it, refinish it?  
    What would you do?  
    I'd love to read your suggestions!

    Thursday, February 10, 2011

    "Look What Mom Did!"

    I've been holding out for a "new addition" to our house.
    The next best thing to a baby - a "great room" with a new kitchen, dining and living room.  For a variety of reasons that plan is on hold.

    traditional kitchen Traditional Kitchen | ELLE Decor
    Elle Decor on Houzz

    To occupy myself (I suppose!) I've been attacking any project that I can do without the Mr.  (Which amounts to a lot of moving furniture, framing pictures and painting!)

    One problem that has (constantly) bugged me are our kitchen cabinets.  They were dark stained (think 60's) plywood - not great quality but super huge/useful.

    When we moved in, we painted the upper cabinets.  I didn't want to mess with painting the base cabinets because they are laminate and we were only going to "live with it" for a little while!  10 years later and I've had enough...  (almost!)

    That big cabinet above the stove is the one - the height above the stove (fire hazard!) the lack of a range hood and it seems to take up so much "weight" in the room.
    It really is one solid piece - everytime I mentioned taking it down, my husband shook his head and walked away, or feined a headache!

    What's a girl to do?
    1.  Empty it out.  Check.
    2.  Inspect.  (9 nails, and a bunch of caulk at the top holding it up!)
    3.  Get the "claw" (I once was "employed" at pulling nails :)
    4.  Wait for husband to leave for work and the kids to go to bed. (No witnesses needed!)
    5.  Grab the ladder, a stool and yank those nails out!
    6.  Take a picture to prove that I didn't call Dad in on the "fun".  (Which may have been a good idea as this one demo has taken the spunk out of me!)

    A vent fan for the stove and either open shelving (Like Lisa from A Vintage Vine has done here.) or a 12 in cabinet (It's dusty out here!) next to the stove will (hopefully!) replace it.
    Remember when I was just going to paint, replace some furniture and window treatments? Yikes!  My list has grown, my budget, not so much!

    With much remorse and regret I got up the next morning and realized...I have no regret!  I'd been hating on that poor cabinet too long!

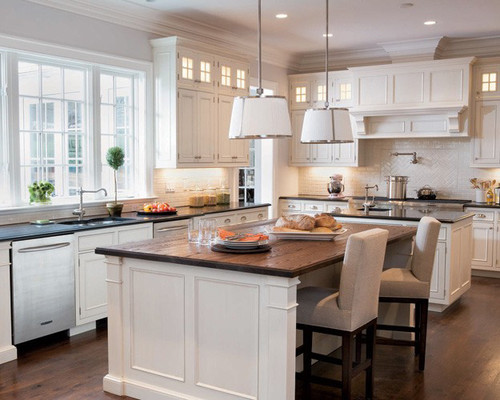
    Looking at this picture I think - take down the other one!

    Some factors (excuses) to consider:
    1.  Teeny tiny budget.
    2.  We have few matching dishes.
    3.  The remaining cupboards are full of edited stuff.
    4.  I may really want to take that other one down but am too afraid (Yikes!)

    What would you do?

    More to come...Stay Tuned!

    Wednesday, February 9, 2011

    Valentine Subway Art

    My Eighteen 25 Valentine Subway Art is in my living room next to ...

    ...some new pillows! 
    This striped fabric has been kicking about 
    and I'd been mumbling "change those pillow covers" 
    every time I walked by the brown pillows on our brown sofa.


      Last night for 3 hours I sewed and messed up, sewed and messed up.  
    (Enough to discover the reverse side looked a bit less like the circus.
    Love a happy accident!) 
    So I made three pillow covers and am now ignoring all requests 
    until I finish this post. 
    (You've totally been there, right?)

     The picture below is my favorite because it includes 
    my daughter's unicorn art and a little stack of my Sweet Valley High books.  


    This subway art is so fun (I love a freebie that includes typography!)...


    Right now, I'm linking up to Eighteen 25's "Where's Your Subway Art?" Party...Later I'll tell you more about my late night Home "Improvement"!
    Stay Tuned! (and Enjoy!)


    Saturday, February 5, 2011

    Valentine Inspiration

    "You inspire me!"
    Three fun words when all joined up.
    Amy at inspire co. is inspiring.
    inspireco.

    I really love her red sofa, the rug (I've searched and searched for it!) and the artwork...fresh and fun!
    Look very close at the window...a curtain of hearts that Amy made hangs in the window.  
    inspireco.
    A Spring Issue of Inspired Ideas, Amy's inspiring magazine, is coming out soon...welcome spring!

    Friday, February 4, 2011

    Living Room Lust

    I love this room!
    Everything but the antlers - though what would I put there instead?
    And they do create "tension" - right?

    When something is put together so well, it makes you fall for something you may not usually have/buy/decorate with!  I may be falling for antlers.  (Let's keep this under our hats antlers for now.

    Let's look around:
    The (cozy) fire, fireplace surround and the transom window with the doors add to the I'm-in-the-warmth-even-if-it's-freezing-outside-feeling.  (Putting myself in the picture, the door is closed, with snow piles outside.)

    Check out the ceiling! The gray from the ceiling repeated in the chair, ottoman and pillows is spot on and not forced. (Janell just sanded down and waxed a dining table that has beautiful lived-well gray finish.)


    via splendid willow
    What did you see first? Was it the ottoman?  Me too!
    The gray fabric, the legs, the tufts - so beautiful!
    (Have you done DIY tufting?  It looks difficult to get it right.) 

    This is how we spend cold, snowy days in the frozen tundra - thinking about antlers tufting and gray wood finishes!
    (Okay, I do.  How about you?)

    Enjoy today!